Tuesday, January 30, 2024

1866 - THIRD ITALIAN INDIPENDANCE WAR - Reg. Nr. 6 "LANCIERI DI AOSTA "

I moved from the Lancieri di Firenze to the Lancieri di Aosta because, by chance, I read that during the hard fought battle of Custoza (1866) this regiment charged 14 times (!) and succeded to stop the advance of the Austrian.  

I thought I could also make this episode:

Lancieri di Aosta - Lieutenant


Monday, January 29, 2024

1866 - ITALIAN THIRD WAR OF INDIPENDENCE - THE LANCIERI

 With the end of the Second Italian Indipendence War the Piedmontese Army undewent a strong increasing of volunteers and troops. Following to this, the size of the Army (still formally called Sardinian Army) increased as well as the Cavalry troops. The idea was in any way to increase the Piedmontese war system expanding to all the new units. This system is still nowadays worgink if you think for example that the Italian officers still wear a blue sash, as in the Piedmontese Army.

The cavalry underwent to the same process and so, next to the historical 4 regiments:

Reggimento Nr. 1 "Nizza Cavalleria"

Reggimento Nr. 2 "Piemonte Cavalleria"

Reggimento Nr. 3 "Savoia Cavalleria"

Reggimento Nr. 4 "Genova Cavalleria"

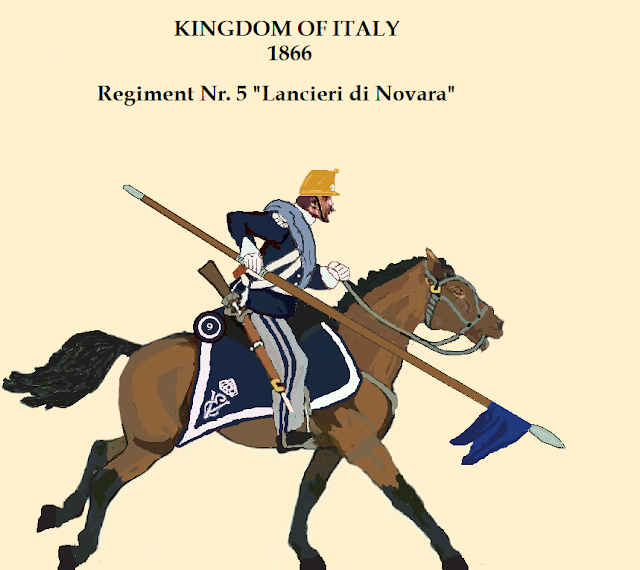
In the years 1860 on were hence formed 7 new Lancieri (some originally Cavalleggeri and then changed as lancieri) Regiments, each with a particular distiguishing colour.

I propose here templates of all 7 Regiments (from nr. 5 till 11, because the numbers continued one after the other) in their campaign dress, considering that in the parade uniform the kepy was of the distinctive colour as well


The officers of each regiment had the stripes of the trousers of the distintive colour, as well as the kepy (for all)

Finally it went out they had no carabines and no numbers. So I modified again (here bottom)


Friday, January 26, 2024

1866 - THIRD ITALIAN INDIPENDANCE WAR - Regiment Nr. 9 LANCIERI DI FIRENZE

 I had always had the will to try myself with a template of Italian units of their first campaing, i.e. the 1866 War, that saw Italy and Prussia against Austria. I wanted to make some templates of Prussians but them I moved to this little project.

So I decided - eventually - to represent a little fighting of that Campaing, i.e. the Battle of Versa on 26th July 1866.

In this battle, from the Italian side, gought 5 squadrons (400 men) of the new Lancieri di Firenze, Regiment Nr. 9. I think that in English there is really no info. At the contrary, in Italian I found a lot of info that allowed me to make the template of this regiment at that Battle.


Copyright Michele L. SAVASTA FIORE

To  do that I used as a basis the template of the Cavalier or the Nizza Regiment (Nr. 1) during the First Italian Indipendence War and I tranformed it.


It was not very simple - as usual - to understand all the details, even though there are a lot of articles on it. First I had to decide whether to go for the campaign or service uniform. I opted for the first one, because I want to represent the Battle. The problem that immediatly arose was the kepy. In the service uniform it was of the colour of the Regiment (for Nr. 9 the orange) but in battle I had doubts: actually as in colours, I found only this painting. While the ribbons seems to be red, they were orange. The kepy - here - is yellowish and some other representations make of this regiment for all its troops in this way. 


Nontheless, I was able to find the Stato Maggiore dell'Esercito Italiano that pointed out that the troop covered the kepy in battle with a black cover, while officers only carried the yallowish cover of the kepy. I had so doubts about how to represent it.
In fact I found a quite simple copy of a postcard with this colours:


I was keen to follow in any case the info from the Italian General stab and hence to make the cover in black. To finally help me to solve it I was lucky (and able) to find original photos of Lancieri in campaing uniform ("Montura di via").


It seems evident (having a look at these pictures) that the cover was black for troops and NCO, and yellowish only for the officers.

But then I friend on TMP pointed out that in b/w photos yellow colour became like black.  So I got back to my doubts and I found this painting of lancieri:


I hence understood that I was wrong and the cover on the kepy was actually yellowish. (moreover I found another mistake: the stripes on trousers were blue for all regiments and in distinctive colour just for officers)

So I went on the superb non plus ultra unifor text/tables painted one century ago by Quinto Cenni and I found all... I should have done before...


Here bottom another 2 confirms that the campaign kepy was covered with a yellowish protection


It is possible to see (frontal top) the cover of the kepy in the correct colour. yellowish. So I decided to remake my template, as follows:


This (top) is the new version corrected


and the last one with correct monogramm (see top left) and apulettes in white, new white belt


Further with my researches, it went out that the Lancieri did not carry any rifle. So I remade it again. This time I use a template of the Regiment Lancieri di Aosta to give idea (bottom).


Wednesday, January 10, 2024

PUNIC WARS - ROMAN TRIREME 2nd PART

I have to admit I started to like to make this trireme. From the original template I went on, increasing a lot of details that I would love to point out here:

1st detail: THE RAM

Originally, it was done in this way. But if we consider that the template reproduces the trireme floating, i.e. with a part of the skull under the waterline, the ram schould be (partially) under the waterline.

Picture 1 - The original ram


So I decided to remake it (bronze colour, like the original) and half of it (being the second half under the water line. Here bottom the result:
Picture 2 - The modified ram


2nd detail: THE HATCHWAY/GRATE. In this case, it was just depicted, and I did 3D
Picture 3 - The 2D grate

Picture 4 - The 3D grate


3rd detail: THE STERN & its DECORATIONS

I really did not like the way originally the stern was looking (bottom here)

Picture 4 - The original stern


So after preparing a  (first) different decoration and checking how to glue it, I had to trim a little bit the original stern. 
Picture 5 - Trimming of the original stern decoration


Finally (picture 6) I glued the new decoration
Picture 6 - The (first) new stern


But I was not happy with the final result, so I went on and again after trimming and glueing I finally achieved the desided result. This is a real Roman stern (picture 7)

Picture 7 - The second stern


4rd detail: THE BOW& its DECORATIONS

Also the bow had to undergo some deep modifications. Originally, it was like in picture 8 (bottom)

Picture 8 the original bow

Picture 9.  The original bow cut

Picture 10.  The original bow cut nr 2


Finally I glued the new bow in front, with a very big eye and a different motif (much more elaborated)

Picture 11  The new bow 


5th detail: THE UPPER EDGES

In the previous picture (nr. 11) it is also possible to see the upper edge of the trireme. I decided to modify also this (picture 12). I substituted the simple fence with white shields and a passage for the soldiers to embark on the trireme done with matches.

Picture 12 The new upper edge 


The final result (with removable sails) is as in pictures nr 13 and 14

Picture 13 The Roman Trireme with legionaries 

Picture 14 with the sail